Cooking Gluten-Free with Anna

Showing posts with label holiday. Show all posts

Sunday, February 17, 2013

I love Semlor


Swedish Semlor


These Swedish almond paste and whipped cream filled cardamon buns are traditionally served during Fat Tuesday. Nowadays, Swedes are happily inhaling them as often as they can be found. Semla is a cardamon-spiced bread, which has its top cut off and insides scooped out, then filled with an almond paste, and topped with whipped cream. The top is dusted with some confectioners' sugar.

Ingredients:1 1/4 cups sugar1 1/4 cups GF flour blend2 tbsp GF psyllium powder (Metamucil) 2 tsp baking powder2 tsp ground cardamon 1/8 tsp salt4 tbsp butter, melted3 eggs, lightly whisked1 1/4 cups cultured Kefir, or buttermilk

6 ice-cubes

2 cups heavy cream1 tbsp vanilla pudding mix

Filling:5 tbsp heavy cream7 oz GF almond paste

Decoration:confectioners' sugar

Directions:

Preheat the oven to 450 degrees F. Place a cookie sheet on the lowest oven rack. 

Line cupcake pan with 8 large paper liners. Set aside. 


In a medium bowl, whisk together sugar, GF flour, psyllium, baking powder, cardamon and salt. Add the melted butter, eggs and Kefir, and mix until incorporated, scraping down sides of bowl. Divide batter evenly among the 8 liners. 


Place cupcake pan on the pre-heated cookie sheet. Add 6 ice-cubes on the cookie sheet, and quickly, close the oven door. Bake until cupcakes are lightly golden, about 15-20 minutes. Do not open oven door the first 15 minutes. Transfer to wire to cool completely under a clean kitchen towel.

Whip the heavy cream together with the vanilla pudding mix until the cream forms soft peaks.Make filling: grate almond paste and mix with the heavy cream. 

Cut the tops of the cupcakes. Using a spoon, scoop out about a teaspoon of the inside of each cupcake. Fill the wholes with the almond paste. Spoon dollops of the whipped cream on each cupcake. Replace the tops. Dust with confectioners' sugar and serve! 

Smaklig Måltid~ Bon Appetite

Wednesday, June 20, 2012

Strawberry season is finally here ~ time to make Rustic Strawberry Crostata.


I'm back home in the good old USA! It was wonderful to spend so much time with my family in Sweden, but it's really nice being back home. And to sleep in my own bed.  And cook in my own kitchen. I tried lots of new recipes in Sweden that I will adjust to American measurements. Many will end up on the blog in the future.  While in Sweden, I had problems with my laptop and the access to Internet, so my blog entries got fewer and far in between. And unfortunately, it rained a lot. According to records, it hasn't rained this much since the beginning of the century. Hopefully, it'll turn around for tomorrow, when Swedes celebrate Midsummer. A day of eating and partying - a Smörgåsbord filled with yummy dishes like; Gravlax with dill-mustard sauce, pickled herrings, gilled meats, Janson's Potato Temptation. All washed down with a few snaps (vodka shots).  I'll have to make my own versions of the food here at home!

This is a nice time of year to return to Massachusetts, with summer and vacation time around the corner.  And with strawberry season just beginning, it makes it extra sweet. I love the amazing fresh produce arriving at the local farmer's markets right about now. Time gorge on lots of strawberries! 


I bought several quarts at a local market and went home and made some strawberry jam and a pie. I have a great Rustic Apple Crostata recipe that I alter, according to whatever fruit and berry is in season.  I love the homey look of this pie. It's super easy to make and the gluten-free pie crust is flaky and delicious.  The fresh strawberries added just the right sweetness. This rustic tart is my contribution to Månadens Sötsak, a wonderful Swedish baking blog ~ www.sotsaker.com  The theme for this month is Fresh (Friskt in Swedish).  And what can be fresher than freshly picked strawberries! It's also my contribution to Pie Party 2012 on Facebook. 


Rustic Strawberry Crostata
1 quart strawberries
4 tbsp sugar
1 tsp fresh lime juice
1/2 tsp ground cinnamon
pinch of kosher salt
2 tbsp butter, cut into bits
2 tbsp heavy cream, to brush crust
1 tbsp sugar, to sprinkle on crust
Recipe for Pate Sucree (crust) follows
Preheat the oven to 350 degrees.  
Cut the strawberries into small pieces and place in a large mixing bowl.  Add the sugar, lime juice, cinnamon and salt and toss to coat well.  Set aside to let the flavors blend for 10 minutes.
On a well floured (gluten-free brown rice flour works well here) parchment paper, roll the dough out into a 15-inch circle.  


Transfer the dough and parchment paper to a baking sheet.  Mound the strawberries in the center of the dough, making sure to leave a 2-inch border.  


Dot the berries with the 2 tablespoons of butter and fold the dough border up around the strawberries. (The border won’t cover the strawberries.)  Brush the dough with the heavy cream and sprinkle with the 1 tablespoon of sugar. 
Place the baking sheet in the bottom third of the oven for 30 minutes.  After 30 minutes, move the baking sheet to the top third of the oven for an additional 30-40 minutes, until the crust is golden.  Remove and let cool for 15 minutes before serving.  Drip some of the strawberry juice, that may have seeped out around the pie, back onto the strawberries. Serve warm or at room temperature with a dollop of ice-cream or whipped cream. 
Make the crust - Pate Sucree:
3/4 cup brown rice flour
1/4 cup potato starch
1/4 cup sweet rice flour
4 tbsp sugar
1 tsp xantham gum
1/2 tsp kosher salt
10 tbsp butter, chilled and cut into bits
2-3 tbsp ice water
Put the flours, sugar, xantham gum, and salt into the bowl of a food processor. Pulse to combine.  Add the butter and pulse until the mixture resembles coarse crumbs.  With the food processor running, add the ice water 1 tablespoon at a time until a dough just begins to form.  Turn out onto a floured surface and pat into a disk. Wrap in plastic wrap and refrigerate for at least 30 minutes.  


Dig in and enjoy! 

Smaklig Måltid!


Sunday, February 26, 2012

Pancakes - it's what's for breakfast!


Grab your whisks and fire up the griddle - it's Pancake Week!

According to www.allrecipes.com this is an ancient tradition from the Middle Ages. In preparation for Lent, people cleaned out their pantries of rich foods, like butter, eggs, and milk. They feasted on big batches of pancakes until the pantry was empty. Sounds pretty good to me. These days, many communities around the globe still follow this tradition, all the way through Fat Tuesday or Mardi Gras.

Pancakes come by many names - flapjacks, hotcakes, johnnycakes, griddlecakes, blinis, blintzes, crepes. You can make them with chocolate chips, bananas, pumpkin, fresh berries, or buckwheat. And lather them with butter, honey, jam, whipped cream, chocolate ganache, sour cream & caviar. It doesn't matter - it all adds put up to good eating!

I'm particularly partial to wolfing down my breakfast pancakes with lots of Maple Syrup. The real deal, not some fake stuff. During a recent walk, my husband and I came upon a grove of Maple Trees being tapped. Each tree had a bucket attached to it. And in each bucket, drop by drop, it was being filled with tree sap. We thought it a bit early in the season to begin this process, but, maybe the Maple syrup season started earlier this year due to the unusually mild winter. From what I remember; the starch in the trunk and roots of the trees is converted to sugar that then turns into sap in the spring. When this sap is heated, the water evaporates, leaving a syrup. The American Indians collected Maple syrup and taught the European settles how to use it.


Homemade Pancakes with Maple Syrup

Recipe adapted from Barefoot Contessa - Family Style


Ingredients


1 1/2 cups Anna's GF Cake Flour Blend,* or your own favorite flour blend

2 tbsp sugar

2 1/4 tsp baking powder

1 1/2 tsp kosher salt

1/2 cup Kefir, or yogurt

3/4 cup milk

2 large eggs

1 tsp vanilla extract

butter


1- 2 bananas, diced, for serving, or fresh fruit and berries

Pure maple syrup


Directions


In a medium-sized bowl blend together the GF flours, sugar, baking powder, and salt.


In a separate bowl, beat together the sour cream, milk, eggs, and vanilla.


Pour the wet ingredients to the dry ones, whisking until combined.


Melt butter in a large skillet, or griddle, over medium heat until the butter bubbles. Pour some off the pancake batter into the pan to make 4, to 6, small pancakes. Cook for about 2 to 3 minutes, until some bubbles appear on top and the underside is lightly browned. Flip the pancakes and then cook for another minute until nicely browned. Add a little more butter to the pan, and continue until all the batter is used. Serve with maple syrup, sliced bananas, and/or fresh berries.


Anna's GF Cake Flour Blend:

2 cups brown rice flour

2 cups white rice flour

1 cup potato/or corn starch

1 1/4 cups tapioca starch


I'm grateful for this luxurious liquid gold!


Tuesday, February 14, 2012

Celebrating Valentines Day with Neapolitan Cakes with Swiss Meringue Buttercream


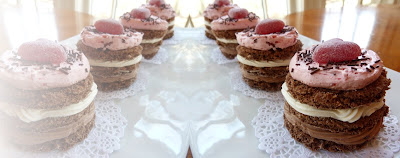
This dessert has it all, good looks and a sweet attitude. Nothing can compare with its three layers of buttercream, unfolding in your mouth in soft waves. Each cloud-like layer is infused with its own heavenly delights, rich chocolate, delicate vanilla, and sweet raspberry. It's a beauty, all right.

The original recipe is from Sweetapolita. A place full of gorgeous photographs and inspiring recipes. I happened up on this site by default. A fellow blogger was in the thrals of baking a rainbow-colored cake for her daughter's birthday. She, in turn, had found her cake recipe on the aforementioned blog. It was fate (I think). True happiness is to find a cookbook or blog that shares your philosophy. I can always tell by the photographs, and these are good enough to eat.

My version is, of course, gluten-free, and, of course, heavenly. The cake recipe is my own, and I used Sweetapolita's Swiss Meringue Buttercream. When I served it to my husband, five seconds later, it was gone... It was well received. Try it yourself!


Neapolitan Cakes with Swiss Meringue Buttercream


Makes 6 mini cakes


Ingredients


3 eggs

3/4 cup sugar

6 tbsp potato starch

4 tbsp cocoa powder

1 tsp baking powder

1/3 tsp kosher salt

1/4 cup shredded sweetened coconut


Sweetapolita’s Swiss Meringue Buttercream

5 large fresh egg whites

1 1/4 cup granulated sugar

3/4 pound (3 sticks) unsalted butter, softened, cut into cubes

2 teaspoons pure vanilla extract

Pinch of salt


Baking Instructions


Preheat oven to 475 degrees.

Line a jelly roll pan (rectangular pan about 16”x 11” x 11”) with parchment paper.

In a stand mixer with paddle attachment, beat the eggs and sugar until thick and pale yellow ribbons form.

In a medium sized-bowl, mix the potato starch, cocoa, baking powder, salt, and coconut.

Gently fold the dry ingredients into the egg mixture.

Spread batter into the prepared pan and bake for 5 minutes.

Remove from oven.

Meanwhile, cut a piece of parchment the same size as the jelly pan, and place on the kitchen counter. Sprinkle sugar all over the parchment paper.

Let the cake cool in the pan for 6 minutes.

Invert cake onto prepared parchment paper.

Slowly, starting at one corner, remove the parchment from the bottom of cake. If the paper sticks to the cake - using a pastry brush, brush the paper with a little cold water, then remove the paper.

Place a clean kitchen towel on top of the cake. Let cool completely.


Prepare Sweetapolita’s Swiss meringue buttercream: This buttercream is just amazing. I found it on a www.sweetapolita.com - a blog featuring gorgeous cakes, with tons of tips. Even for a gluten-free baker!

Add egg whites and sugar to the bowl of an electric mixer, and simmer over a pot of water (not boiling), whisking constantly but gently, until temperature reaches 160°F, or if you don’t have a candy thermometer, until the sugar has completely dissolved and the egg whites are hot.

With whisk attachment of mixer, begin to whip until the meringue is thick, glossy, and the bottom of the bowl feels neutral to the touch (this can take up to 10 minutes or so).

Switch over to paddle attachment and, with mixer on low speed, add softened butter in chunks until incorporated, and mix until it has reached a silky smooth texture (if curdles, keep mixing and it will come back to smooth).

Add vanilla and salt, continuing to beat on low speed until well combined. You can also add a wide variety of flavorings, extracts, and more, but always add the vanilla first, as it brings out the true taste of the other flavors.

Makes approximately 5 cups of buttercream.

Divide buttercream evenly into 3 bowls. Flavor 1/3 with chocolate, 1/3 with 4 tbsp raspberry jam, and leave final 1/3 vanilla.

For Chocolate Buttercream: melt 4 oz of semi-sweet chocolate in the microwave oven for 10 seconds, stir, continuing in 10 seconds intervals until melted. Blend with buttercream until smooth. Use good quality chocolate. I like Ghirardelli Chocolate.

For Raspberry Buttercream: add 3-4 tablespoons of raspberry jam to taste. Blend until combined.

You’ll end up with leftover buttercream. Not a problem. Keep buttercream in airtight container in refrigerator for up to one week, leaving out at room temperature when needed, re-whipping in mixer for 5 minutes. Or freeze for up to 6-8 weeks. To thaw, place on counter overnight, and rewhip for 5 minutes with paddle attachment in an electric mixer.


Assembly of the Neapolitan Cakes

Using a 3-inch round cookie cutter, cut out 18 rounds of the cake. The recipe makes 6 mini cakes - 3 rounds for each cake. Lay out 6 cake-circles in front of you on the kitchen counter or on a platter.


Spread the bottom layers with the chocolate buttercream. Add the second cake layers. Spread with vanilla buttercream. Add the top cake layers, and spread with raspberry buttercream. Top with GF chocolate sprinkles, if desired.

Cover the cakes loosely with plastic wrap or a cake dome. The cakes keep in the refrigerator for up to 2 days. Remove from refrigerator 3 hours before serving, to let the buttercream soften. If eaten the same day, keep the cakes covered at room temperature.


Share something sweet with someone...


Thursday, February 2, 2012

A heavenly cream filled bun


These Swedish almond paste and whipped cream filled cardamon buns are traditionally served during Fat Tuesday. Nowadays, Swedes are happily inhaling them as often as they can be found. Semla is a cardamon-spiced bread, which has its top cut off and insides scooped out, then filled with an almond paste, and topped with whipped cream. The top is dusted with some confectioners' sugar.

Sounds good? They are! I love that the bun is not overly sweet, nor is it too big (this way I can have two). My mom served them the old fashioned way, called hetvägg, in a bowl of warm milk. Sounds weird? Yes, perhaps. But I loved it as a kid. The smooth almond filling and whipped cream blended well with the sweet milk, which softened the bread. Now I prefer them straight up, with a strong cup of coffee.

Traditionally, they were served before Lent. I would say that the true meaning of Fat Tuesday is lost on most Swedes, me included. However, eating a Semla is a religious experience in itself. Now everyday can be Tuesday!


Semla

Makes 24 buns

Ingredients

6 tbsp butter
1 1/2 cups milk
2 tsp dry yeast
2 tsp psyllium husks ( see below, on resources)
1/2 cup sugar, plus 1 tsp for the yeast liquid
1/4 cup honey
1 tsp kosher salt
2tsp guar gum
1 tsp gelatin, unflavored
2 large eggs, whisked
3 tsp ground cardamon
1 1/2 cups corn starch
1 cup white rice flour, plus 1/3 cup for rolling the dough
1 cup tapioca starch

Egg Wash:
1 large egg, whisked
1 tbsp water

Filling:
7 oz GF almond paste
1 -2 tbsp milk, enough to blend with almond paste

Whipped Cream:
1 1/4 cups heavy cream
1 tbsp confectioners' sugar


Directions:

Melt butter in a medium sauce pan. Add the milk to the melted butter and heat until about 110-115 degrees F. Pour the heated liquid into a medium-sized bowl.


Add the yeast, psyllium husks, 1 tsp sugar and whisk together until yeast has dissolved. Let sit for 10 minutes to proof and activate the yeast. The liquid should expand.


Pour the yeast liquid into a bowl of a stand mixer fitted with the paddle attachment. Add the sugar, honey, salt, guar gum, gelatin, the whisked eggs, cardamom, and gluten-free flours to the mixer. Beat on medium speed for 5 minutes. Scrape down the bowl occasionally. The dough will be sticky, do not worry, this is normal.


Remove the mixing bowl. Drape a clean kitchen towel, or plastic wrap, over the bowl. Place the mixing bowl in a warm part of the kitchen, and let the dough rise for 75 minutes.


Shape the dough into 3" balls by scooping the dough out with a large spoon. Using wet hands, gently press into shape. You might need to wet your hands in between each roll, to prevent the dough from sticking and to create a smooth surface. But take care not to make the dough soggy.


Place the rolls onto parchment-lined cookie sheets. Allow the rolls to rise, loosely covered with plastic wrap or a clean kitchen towel, for 40 minutes.


During the last 20 minutes of the rise, preheat the oven to 350 degrees F.


Remove covers from the baking sheets. Using a pastry brush, brush each roll with the egg wash.


Bake near center of the oven for about 15-18 minutes, or until golden.


Transfer the rolls to a wire rack, cover with the kitchen towels, and let cool to room temperature. The buns are also delicious on their own, sliced and spread with some butter.


Once cool, cut a slice off the top of the bun. Scoop out the center of the bun.


Blend the almond paste with the milk until smooth. Add additional milk if needed until the filling is nearly as soft as pudding.


Whip cream with the confectioners' sugar to soft peaks. Fill each bun with a spoonful of the almond mixture. Pipe whipped cream on top of the filling to about 1/2 inch over the top of the bun. Replace the top onto the bun, and dust with confectioners' sugar before serving.


Dig in!


*Psyllium husks are the same as Metamusil, which is gluten-free. Get the unflavored variety. This adds fiber, texture and elasticity to the dough.


Wednesday, January 4, 2012

GF baking mix ~ $19. Brownies, ice-cream and a movie with husband and son. Priceless!

Last night I made Shrimp Scampi for dinner and brownies for dessert. I didn't make the brownies from scratch but from a mix. A very expensive mix. I had bought it at William-Sonoma the same day while I was at the mall checking out the holiday sales. It's always fun to browse through this upscale kitchen store. Here, you can find anything a cook might desire, from celebrity cookbooks, designer bakeware to cutlery. My motto is - one can never have enough cookbooks or kitchen tools. Right? Right. Most times, I don't buy. But it's fun to look. This time I went into the store searching for a Gluten-Free flour mix: Cup4Cup. People had raved about it on-line. This product was created by Thomas Keller, a celebrated and highly acclaimed Chef from The French Laundry in Napa Valley. I'm dying to eat at this restaurant. Every one of my friends who has dined there says it's beyond gourmet, just divine. Logic follows that his baking products must be equally divine. Well, when I got to William-Sonoma, it was sold out! What to do?? On the shelf was another product by Keller, a Gluten-Free Brownie Mix.


But hold onto your wallet. The price was $18.95. I know gluten-free flours are more expensive that regular flour, but this is crazy. Why pay this much, for a mix at that? Hey, it's Thomas Keller @ William-Sonoma. Need I say more. Not Target (I wish). Throw in the eggs and butter, and you have some dreamy brownies costing you over $20. A must try. I'm being a little bit sarcastic, but I mean it. I had to try it, if only to find out how it compared to my own (homemade) flour mix.


The directions were easy to follow. You only needed to add butter and eggs. My only gripe (besides the price) is that the Nutrition Facts reads 19 Servings per Container, 230 calories per piece. But according to the directions, the recipe makes 16 squares. Shouldn't the number be the same? I don't usually worry about calorie content while eating brownies, but with this one I was curious to find out. The recipe called for lots of butter, 12 Tbsp to be exact, 4 eggs, and melted Guittard chocolate. This recipe made one small 9-inch pan! Can't really feed a crowd with that. ,However, the brownies turned out delicious, rich and very chocolaty. So will I buy this product again? Not often, but I will if I'm craving chocolate and don't feel like baking. My next task is to try to replicate the recipe using my own flour mix. I'm up to the challenge. My husband, who is not gluten-free, loved them. So did I. Served with some vanilla ice-cream, it was heaven!


Going once, going twice...


Gone!!!